GIMP Selection Tools
When we created our first image, we used the Ellipse tool. The Ellipse tool is from a group of tools known as selection tools.
Selection tools are an essential part of GIMP. You'll find that many tasks you perform in GIMP will involve a selection tool.
What Do Selection Tools Do?
Selection tools enable you to select exactly which part of the image you want to work with.
Once you make a selection, anything you do will apply only to that area (the area that the selection covers). This is essential when building shapes (like the smiley face from our previous lesson). It is also essential when selecting objects from photos.
When you make a selection, the selection is made against the current layer. We'll cover layers soon but, basically layers allow you to break your image up into separate parts - all stacked upon each other.
I highly recommend becoming familiar with the various selection tools. There are different selection tools for different situations. Choosing the right tool for the job can save you a lot of time.
Example
Take the following photo for example.
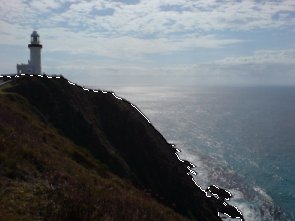
In this photo, most of the hill has been selected. You can tell because "Marching Ants" follow the edge of the hill. The lighthouse, the ocean, and the sky are not selected.
This selection was made using the Fuzzy Select Tool - otherwise known as the Magic Wand. The Magic Wand works based on color similarity. It selects parts of the image that are similar in color to the area you click in.
So now that the hill has been selected, our work on the image will only apply to the hill. For example, if we grabbed the Brush tool and drew a big line through our image, it would only affect the part where the selection is. Perhaps a more realistic task would be to adjust the colors or brightness of the hill. Another thing we could do is copy the hill and paste it into another image. We could also add the lighthouse to our selection.
Creating A Selection
The way you create a selection will depend on the selection tool that you use. Some require you to click and drag. Some require you to click various parts of your image in order to indicate the selection area. Others simply require a single click. Most are reasonably intuitive.
The table further down in this lesson outlines each tool and how to use it.
"Deselecting" A Selection
Once you've made a selection, it will usually stay there, waiting for you to do something with it. If you decide that you don't need the selection, you can remove it.
You can remove/deselect an active selection by going to Select > None, or using the keyboard shortcut of Shift+Ctrl+A.
Another way of removing an active selection is by clicking outside of the selection (while still having a selection tool selected).
Modifying A Selection
You can modify an active selection by holding the Shift key down while modifying the selection. If you don't hold this key down, you will wipe your existing selection and create a new one.
You can also add to existing selections by using a saved path or channel. More on saved paths and channels below.
Saving A Selection
Selections are generally temporary - once you "deselect" a selection it's gone forever. Once you deselect a selection, you will need to make your selection again.
Having said this, if you think you might need to use the selection again in the future, you can always save it as a path or channel.
To save as a path, use the Save to Path option. Once it has been saved as a path, you can reload the selection from within the Path dialog box by right clicking on the path and selecting Path to Selection).
To save your selection as a Channel, use the Save to Channel option. You can reload the selection from within the Channel dialog box by right clicking on the channel and selecting Channel to Selection.
The Selection Tools
Let's have a quick look at the various selection tools, what they do, and how to use them.
| Icon | Tool | Description |
|---|---|---|
| Rectangle Selection Tool | Selects an area in the shape of a rectangle. Simply click and drag to create a rectangular selection. The selection is made once you release the mouse. | |
| Ellipse Selection Tool | Selects an area in the shape of an ellipse (a circular shape). Simply click and drag to create an elliptical selection. The selection is made once you release the mouse. | |
| Lasso Selection Tool | Allows you to draw a selection free-hand with your mouse or other pointer. When you release the mouse button, the selection is closed by connecting the current pointer location to the start location with a straight line. You can go outside the edge of the image display and come back in if you want to. | |
| Fuzzy Select Tool (Magic Wand) | Enables you to make a selection, based on contiguous areas of a similar color range. The color range is determined by the point at which you click on and the value of the Threshold (within the Tool Options dialog). | |
| Select By Color Tool | Allows you to select areas of an image with a similar color range. The difference between this tool and the Fuzzy Select tool, is that the fuzzy select tool selects contiguous pixels — those that are next to, or close to, each other. The Select By Color Tool, on the other hand, selects all pixels within the color range, regardless of their location on the image. | |
| Intelligent Sissors | This tool is useful when you are trying to select a region defined by strong color-changes at the edges. To use the Intelligent Scissors, you click to create a set of "control nodes", also referred to as anchors or control points, at the edges of the region you are trying to select. The tool produces a continuous curve passing through these control nodes, following any high-contrast edges it can find. Note that this tool doesn't always produce a nice, smooth path. Many experienced GIMP users tend to use the Path tool instead. |
|
| Path Tool | Technically, this tool is not a selection tool, however it creates paths - which can be turned into selections. This tool allows you to draw around the edge of any object on your image. More importantly, it provides you much more control than the other selection tools when working with complex shapes. Similar to the Intelligent Sissors, the Path tool results in control points that you can move around as required. | |
| Foreground Select | Using the foreground select tool is done in two steps. First, you make selection which contains the entire object. Then you paint over the selected area with a brush, not crossing the object's border. Release mouse button when you're done and look to see if there are dark blue spots on your objects. If there are some, paint over them with a brush again and release to refine the selection. When there are no more blue areas inside the object, press Enter and your object will be selected. |