Drawing Paths With GIMP
Now that we've learned what the path tool is, let's learn how to draw paths with it.
The Trick To Creating Good Paths
Using the path tool can be a little tricky when you first start out. But hang in there. Take time to practice it, and before long, you will find it as easy as any other tool.
Learning where to place anchors, and how to control them is a crucial part of learning the Path tool.
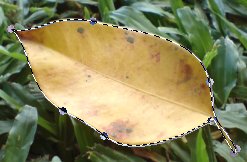
Now, take a look at the anchors in the following image. In particular, look at their position:
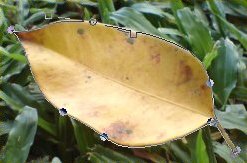
Some anchors are located along a long smooth curved line. Other anchors represent a sharp change in the direction of the path (for example, at the tip of the leaf). There is a technique for doing this.
Many beginners tend to create jagged curves that aren't smooth. This is because they create too many anchor points and don't know how to get a proper curve.
The best way to get a long, smooth curve is to use less anchors with good positioning. Once you get the position right, the handles are there to adjust the angle of the curve as required.
Take another look at the example above. You'll see that the long, smooth lines don't have many anchors. In fact, the anchors that are there, are being used simply to change the direction (or intensity) of the angle.
When I created the above path, I clicked to create the anchor, then I adjusted the handles. If, after doing this, I found that the curve wasn't quite right, I simply "Undid" my anchor (Ctrl+Z) and tried again - this time placing the anchor in a different spot.
Straight Lines
Drawing straight lines are the easiest thing to achieve with the path tool. To draw a straight line:
- Click where you want the straight line to start
- Click where you want the straight line to end
Curves
Creating a curve is where many beginners run into trouble. When creating curves, beginners often find that it's difficult to control exactly where the path runs. But drawing an accurate curve is not as difficult as it may seem.
Three factors impact on getting a good curve with the Path tool:
- Position of the anchor
- Length of the handles
- Angle of the handles
Take a look at the following images:
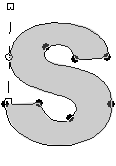
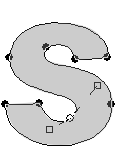
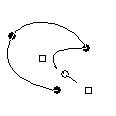
The right image highlights the handles at the top left of the shape. The left image highlights the handles at the bottom, inner curve of the shape.
You can see that on both curves, the handles are straight (or almost straight). On the left image, the large, outer curve needs larger handles than the smaller inner curve (on the right image). Also, both handles on the left image are roughly the same size.
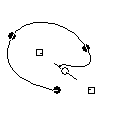
On the right image, the handles are different sizes (the lower handle is shorter). This is to faciliate the differently shaped curves on each side of the anchor.
Corners
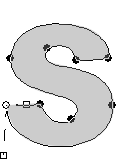
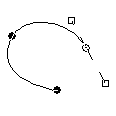
Often when you draw a path, you will need to create a corner immediately after a curve. The curve will be going in one direction, but you need to change it with a sharp angle.
You create corners by simply moving the handle across. For example, in the following image, the top handle is perpendicular to the other handle - it's roughly at a 90 degree angle.
Creating a Corner
To create a corner:
- Create your shape until you get to the corner
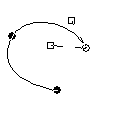
- Drag the handles (as per usual) to get the curve before the corner. Once you're happy with the shape before the corner, release the handle (as per usual). Here's an example:
- Now grab the handle and pull it across in the direction you want the path to go. Example:
- Once you're happy with the angle of the handle, click where you want the next anchor. In this example, I wanted another curve, so I clicked and dragged:
So, step 3 was the operative step. This is where we specified what direction the path was going to take, and how sharp the angle was going to be. Here's what would have happened if we had missed step 3:
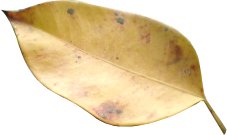
Create Selection From Path
Once we've created the path, we can convert it into a selection. Once we have a selection, we can do whatever we want with its contents.
Here's what our leaf looks like when I create a selection from it's path:
To create a selection from a path:
- Open the Paths dialog box (Dialogs > Paths)
- Right click on the path
- Select Path to Selection
Don't worry, your path will remain after you've made your selection. In fact, you can create a selection from your paths as many times as you wish.
Removing The Background
So, now that I've selected the leaf, I can do anything I like. For example, I could remove the background:
To remove the background, you can copy/paste the selection into another file. Alternatively, you can invert the selection, then delete the background or fill it with white.
To invert the above selection, we'd first select the leaf, then we'd invert that selection (using Select > Invert).