SQL Server 2016: Create a Relationship
You can create a relationship between tables by using the GUI or SQL script. Here, I demonstrate both methods.
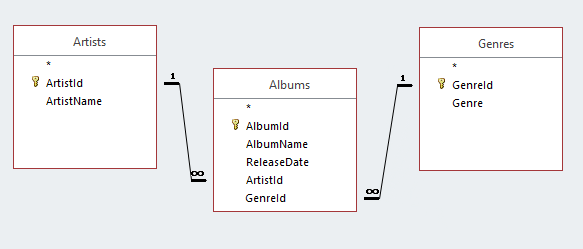
In relational database design, a relationship is where two or more tables are linked together because they contain related data. This enables users to run queries for related data across multiple tables.
Here, we will create the following relationships.
The Method
Here's how we'll do it:
- We'll use SQL to create the Albums table and one relationship.
- We'll use the GUI to create the other relationship.
That way, you'll get to see both methods of creating a relationship.
We only need to create one table because we've already created two of these tables previously in this tutorial (the Artists table via the GUI and the Genres table using SQL).
Create a Relationship using SQL
Open a new query window in SSMS and run the following code:
The first part of that statement creates the table.
The last part defines the relationship. This part:
The first two lines create the relationship. They create a foreign key constraint between the Albums.ArtistId column and the Artists.ArtistId column.
The last two lines specify what SQL Server should do if someone tries to delete or update a parent record that is being referenced by a record in the child table. In this case, NO ACTION means that the delete/update won't go ahead. The user will just get an error.
You could change this to ON DELETE CASCADE if you want to be able to delete the parent and the child in one go (i.e. the delete will cascade from the parent to the child). The same logic applies to updates, by using ON UPDATE CASADE.
NO ACTION is the default value, so we could've done without those last two lines of code. However, I included it, because it's an important factor to think about when creating foreign key constraints.
What's a Foreign Key Constraint?
A foreign key constraint defines a relationship between this table and another table. When you create a foreign key constraint, you create it against a specific column in the child table, to reference a specific column in parent table.
This makes the column in the child table a foreign key. The constraint ensures that any value that goes into this (foreign key) column corresponds with a value in the primary key column of the parent table. If someone tries to enter a value that doesn't correspond with a value in the parent table's primary key column, SQL Server will throw an error.
This helps enforce referential integrity. It prevents us from having orphaned records (child records that have no parent). Or in our example, albums that aren't associated with any artist.
Create a Relationship via the GUI
Now we'll create the other relationship via the SQL Server Mangement Studio's GUI.
It would've been easier to include this in the above script but I wanted to demonstrate both methods of creating a relationship.
-
Open the Child Table in the Table Designer
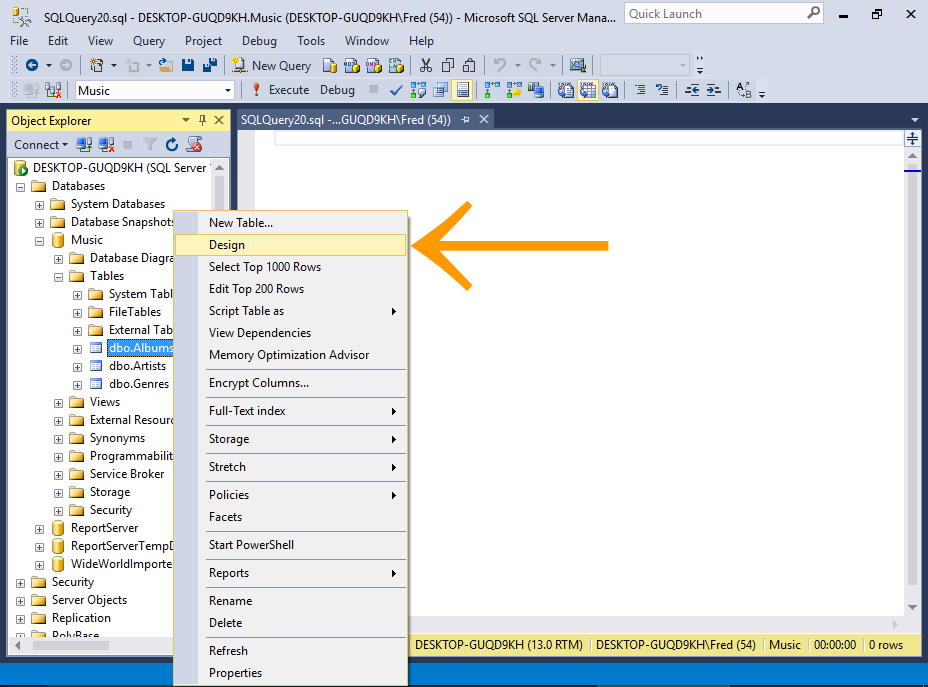
Right-click on the child table (our newly created Albums table) and select Design from the contextual menu.
If you can't see your newly created table in the Object Browser, you probably need to refresh the Object Browser.
Right-click on the Tables node and select Refresh.
-
Open the Foreign Key Relationships Dialog

Select Table Designer > Relationships... from the top menu.
-
Add the Relationship
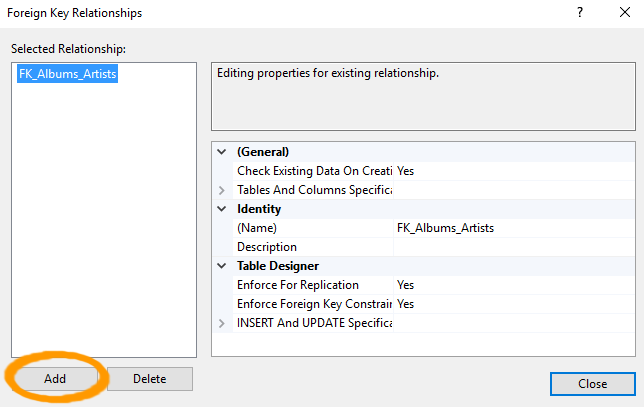
The Foreign Key Relationships dialog will show you any existing relationships for the table. We can see the relationship that we established just before, when we created the table.
Click Add to add another relationship.
-
Select Tables And Columns Specification
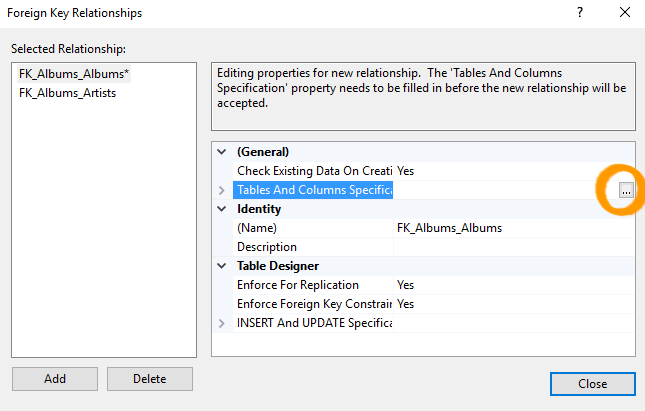
A new relationship appears above the other one in the Selected Relationship list with a name of FK_Albums_Albums.
Ensuring that the the new relationship is selected, click Tables And Columns Specification in the right pane. An ellipses appears to the right of the property.
Click the ellipses (...) to launch the Tables and Columns dialog box.
-
The Tables and Columns Dialog Box
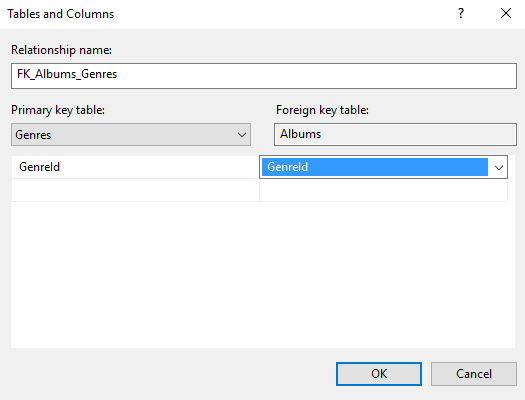
Here, you select the primary key table on the left pane, and the foreign key table on the right.
- Under Primary key table: select Genres as the table and GenreId as the column.
- Under Foreign key table: select Albums as the table and GenreId as the column.
Click OK.
SQL Server will suggest a name for the relationship. You can edit this if you wish. Otherwise, leave it as it is.
-
The Relationship
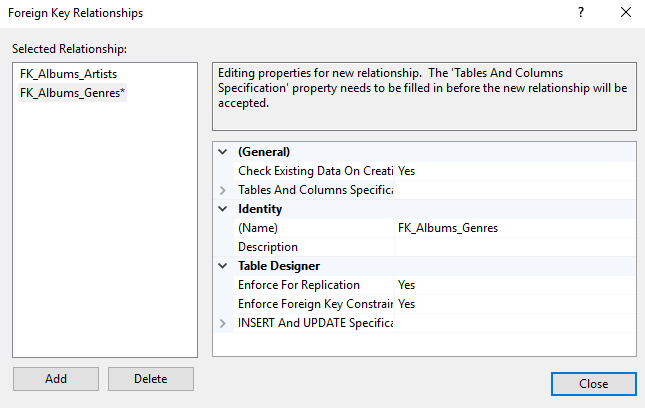
Your relationship will now be displayed correctly in the Foreign Key Relationships dialog box.
Click Close.
-
Saving The Relationship
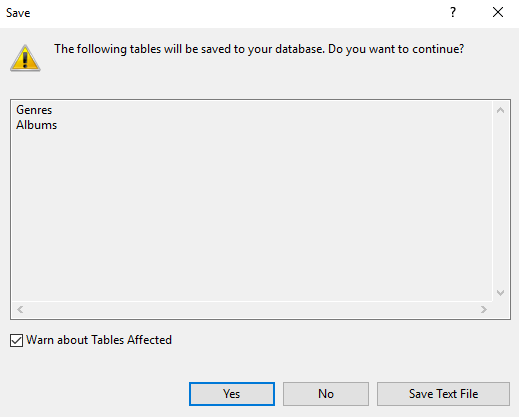
Your relationship won't be saved until you save the table. When you save the table, you will probably get a warning that two tables will be saved. This is to be expected, as the relationship affects two tables.
Click Yes to save both tables.
If you select Table Designer > Relationships... for the parent table, you'll also see the relationship there.