SQL Profiler
See SQL Server Tutorial for a more up to date SQL Server tutorial.
SQL Profiler is a handy tool that enables you to monitor events within your SQL Server (or more specifically, a SQL Server instance). For example, you could use SQL Profiler to check the performance of a stored procedure. You could also use SQL Profiler to troubleshoot a problem that's occuring in your production environment.
When using SQL Profiler, you can save the output to a "trace file" so that you can later analyze the events that occured during your trace.
Accessing SQL Profiler
To access SQL Profiler:
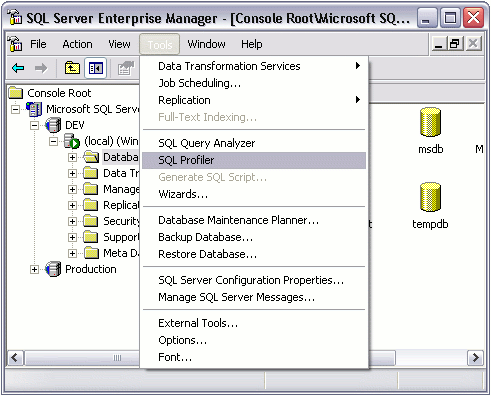
- Open Enterprise Manager
- Select Tools > SQL Profiler menu
Creating & Running A "Trace"
To monitor activity with SQL Profiler, you create a "trace". A trace captures data based on activity at the time it is run.
To create a trace:
- Open SQL Profiler as demonstrated above
- Select File > New > Trace...
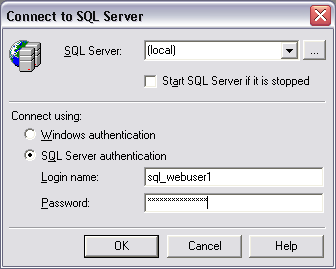
- Select the SQL Server you'd like to connect to, provide authentication details, then click OK
- In Trace Name field, enter a name for the trace, then set the other trace properties as required. For now, just use the default settings
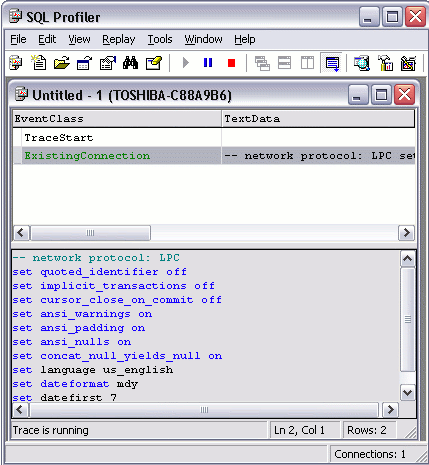
- When you're ready to run the trace, click "Run". You will see something like this:
- When you're ready to stop the trace, click the "stop trace" icon

Explanation of the "Trace Properties" Screen
In the previous steps, when we got to the "Trace Properties" screen (step 4), we used the default trace properties. You can change any of these properties as required. For example, you could save the trace output to a file or database table. You could also change the events, data columns, and/or filter the data presented in the trace.
Following is a more detailed explanation of each tab on the Trace Properties screen.
The "General" Tab
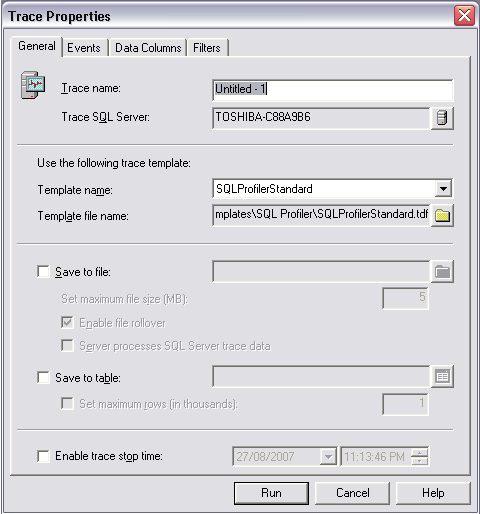
The following table provides an explanation of the options on the General tab.
| Field | Description |
|---|---|
| Trace name | Provides a name for the trace. |
| Trace SQL server | This is the server you'd like to run the trace against. |
| Template name | This allows you to select a template to base the trace on. Templates provide you with a trace where the options from the Events, Data Columns, and Filters tabs are pre-configured. SQL Server includes a number of templates that you can use. SQLProfilerStandard is the default. The template you select will depend on the data you need from your trace. You can also create your own templates if required. |
| Trace file name | Allows you to provide the full path to a template. |
| Save to file | Allows you to save the trace output to a file. |
| Save to table | Allows you to save the trace output to a database table. |
| Enable trace stop time | Allows you to specify a date and time for the trace to stop. |
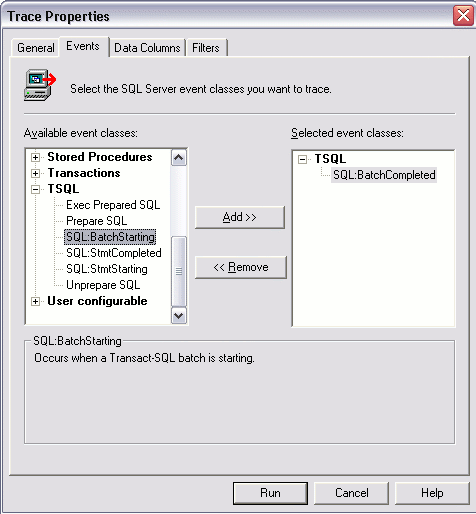
The "Events" Tab
The Events tab consists of event classes grouped by event categories. An event class is the column that describes the event produced by SQL Server. An event is an action generated within the SQL Server engine. Some examples of events include:
- Transact-SQL SELECT, INSERT, UPDATE, and DELETE statements
- Locks being acquired/released
- Stored procedures being started/stopped
- A login connection/failure/disconnection
- A cursor being opened
- Errors written to the event log
- A remote procedure call (RPC) batch status
- Security permission checks
Try adding/removing events to see how this affects the trace output.
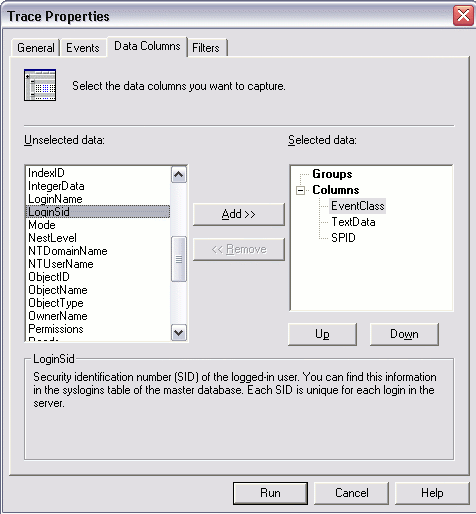
The "Data Columns" Tab
Data columns describe the data collected for each event class included in the trace. When you view the results of a trace, the data is presented within these data columns.
Note that the data columns that are available will depend on the event classes selected. This is because the event class determines the type of data available.
Also note that default data columns are selected automatically with all event classes.
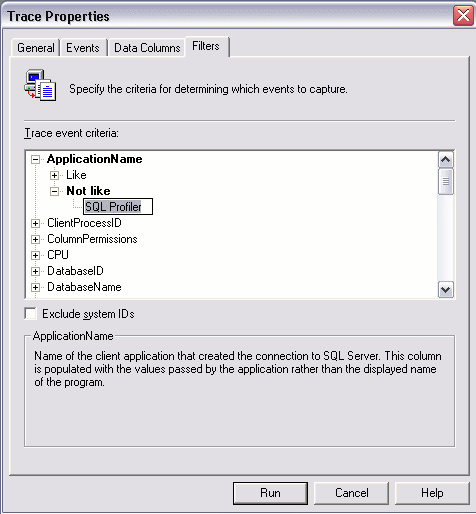
The "Filters" Tab
Filters allow you to filter the data collected by the event. This can help you eliminate data you're not interested in, so that you can concentrate on the data you are interested in. For example, if you're only interested in activity from one user, you can filter the trace to only that user.